With a lack of new content in the lead-up to Endwalker, you may be looking for something to do. And whether you’re itching for mounts, a hardcore alliance raid not available in the duty finder, or the game’s coolest looking sets of armor, one place comes to mind: Eureka.
*Note: This article is designed to be a bare-bones guide to Eureka—giving you nothing more than the information you need to progress quickly and efficiently through it. Many aspects of Eureka are explained at only their most basic level or are ignored completely.
What is Eureka?
Eureka is, in the simplest terms, a second MMORPG hidden within FFXIV. It contains four massive zones, its own level-up system, and even its own 56-man hardcore raid. However, that doesn’t mean it isn’t related to the plot of the main game. In fact, it’s all about a mystery brought up in the main FFXIV story (namely the sudden disappearance of the Students of Baldesion and their home, the Isle of Val).

Unlocking Eureka
To unlock Eureka, you need to complete the main story mission “Stormblood” (i.e., the last quest in the Stormblood expansion) and then head to Rhalgr’s Reach to talk with Galiena (x:9.8, y:12.5) to start the quest “And We Shall Call It Eureka.” Eventually, this will lead you to Kugane and the NPC, Rodney (x:8.6, y:14.2), near the Pier #1 Aetheryte. Talking to him is the one and only way to enter Eureka.
Side Note: If you are doing Eureka to get the awesome-looking “Elemental Armor Set +1,” you will also need to have completed your level 70 job quest to get your “Antiquated” weapon. You will then have to power up this weapon by talking to Gerolt as you progress through the various zone of Eureka.

Prepping for Eureka
Before you head into Eureka, the first thing you need to decide is what class you are going to play. This is because you’re going to want to buy some special armor—and it ain’t exactly cheap. First, you’ll need to buy either two “Cryptic Seals” for if you plan to play as a physical class (which cost around 250k apiece) or three “Damascene Cloth” for the magical classes (which cost around 500k apiece) off of the market board.
Then go to the Nostalgic Fellow (x:7.8, y:14.3) near Rodney on Peir #1 and exchange the Seals/Cloth for the combined head/chest armor “Kirin’s Osode of X” for physical classes or the “Vermilion Cloak of X” for the magical classes. This armor contains both haste (which lessens the global skill cooldown within Eureka) and an elemental bonus which increases both your attack and defense within Eureka. As the basic rule of thumb is that every 170 of Elemental Bonus increases your damage and defense by 10%, having this armor will allow you to fight enemies one or two levels above you in Eureka without any issue. As for your other armor, just use the best level 70+ equipment you have.
Oh, and while you’re at the market board, be sure to pick up a “Potion of Harmony” or twenty. Each one gives you +10% experience within Eureka. (A normal quality one lasts an hour while a high-quality one lasts 90 minutes.)
Side Note: If you’re wondering why Damascene Cloth is so much more expensive than Cryptic Seals, there are two reasons. One is that the caster armor has an elemental bonus of +218 versus the physical armor’s bonus of only +131. The other is that being able to heal yourself is a real asset in Eureka where death is punished quite harshly. (That said, all classes can buy Eurekan Potions for a mere 300 gil a piece at each Eureka basecamp that casts a 40-second long regen heal that helps a lot.)

Fighting in Eureka
Inside Eureka, you’ll be starting over at level 1 (though you’ll be leveling up your character as a whole, not each class individually). You’ll also notice the enemies in Eureka are a bit tankier than their counterparts outside. This is because Eureka has an elemental system not present in the main game. There are six elements in Eureka and each enemy is weak to one element, strong to another, and neutral to the rest. To progress safely and quickly, it’s best to attack each enemy’s weakness.
In the first area of Eureka, Eureka Anemos, you will unlock something called the Magia Board. This allows you to change your element on the fly (though there is a cooldown if you change your element too often). As you go through the main story of Anemos, you will gain five pieces of magicite that can be put into the board corresponding to whichever element you choose. While you may be tempted to split them up evenly, it’s far more effective to put all five magicite into a single element and then change your element as needed.
Side Note: While there are a few ways to switch the Magia Board’s element, the easiest is to right-click a selected enemy (or press square on PlayStation) and select the “Set magia board to offensive” option. You can also type “/magiaauto attack” and it will auto-rotate the board each time you target a creature of a different element. However, as you can only store a maximum of five rotations (and the cooldown for regaining rotations is quite long) you better be careful what you target.

The General Plan For Progression
Regardless of which of the four Eureka zones you are in—Anemos, Pagos, Pyros, or Hydatos—your general plan for progression will be the same.
Drink a Potion of Harmony
It gives you +10% exp.
Find a Eureka Elemental (if you can)
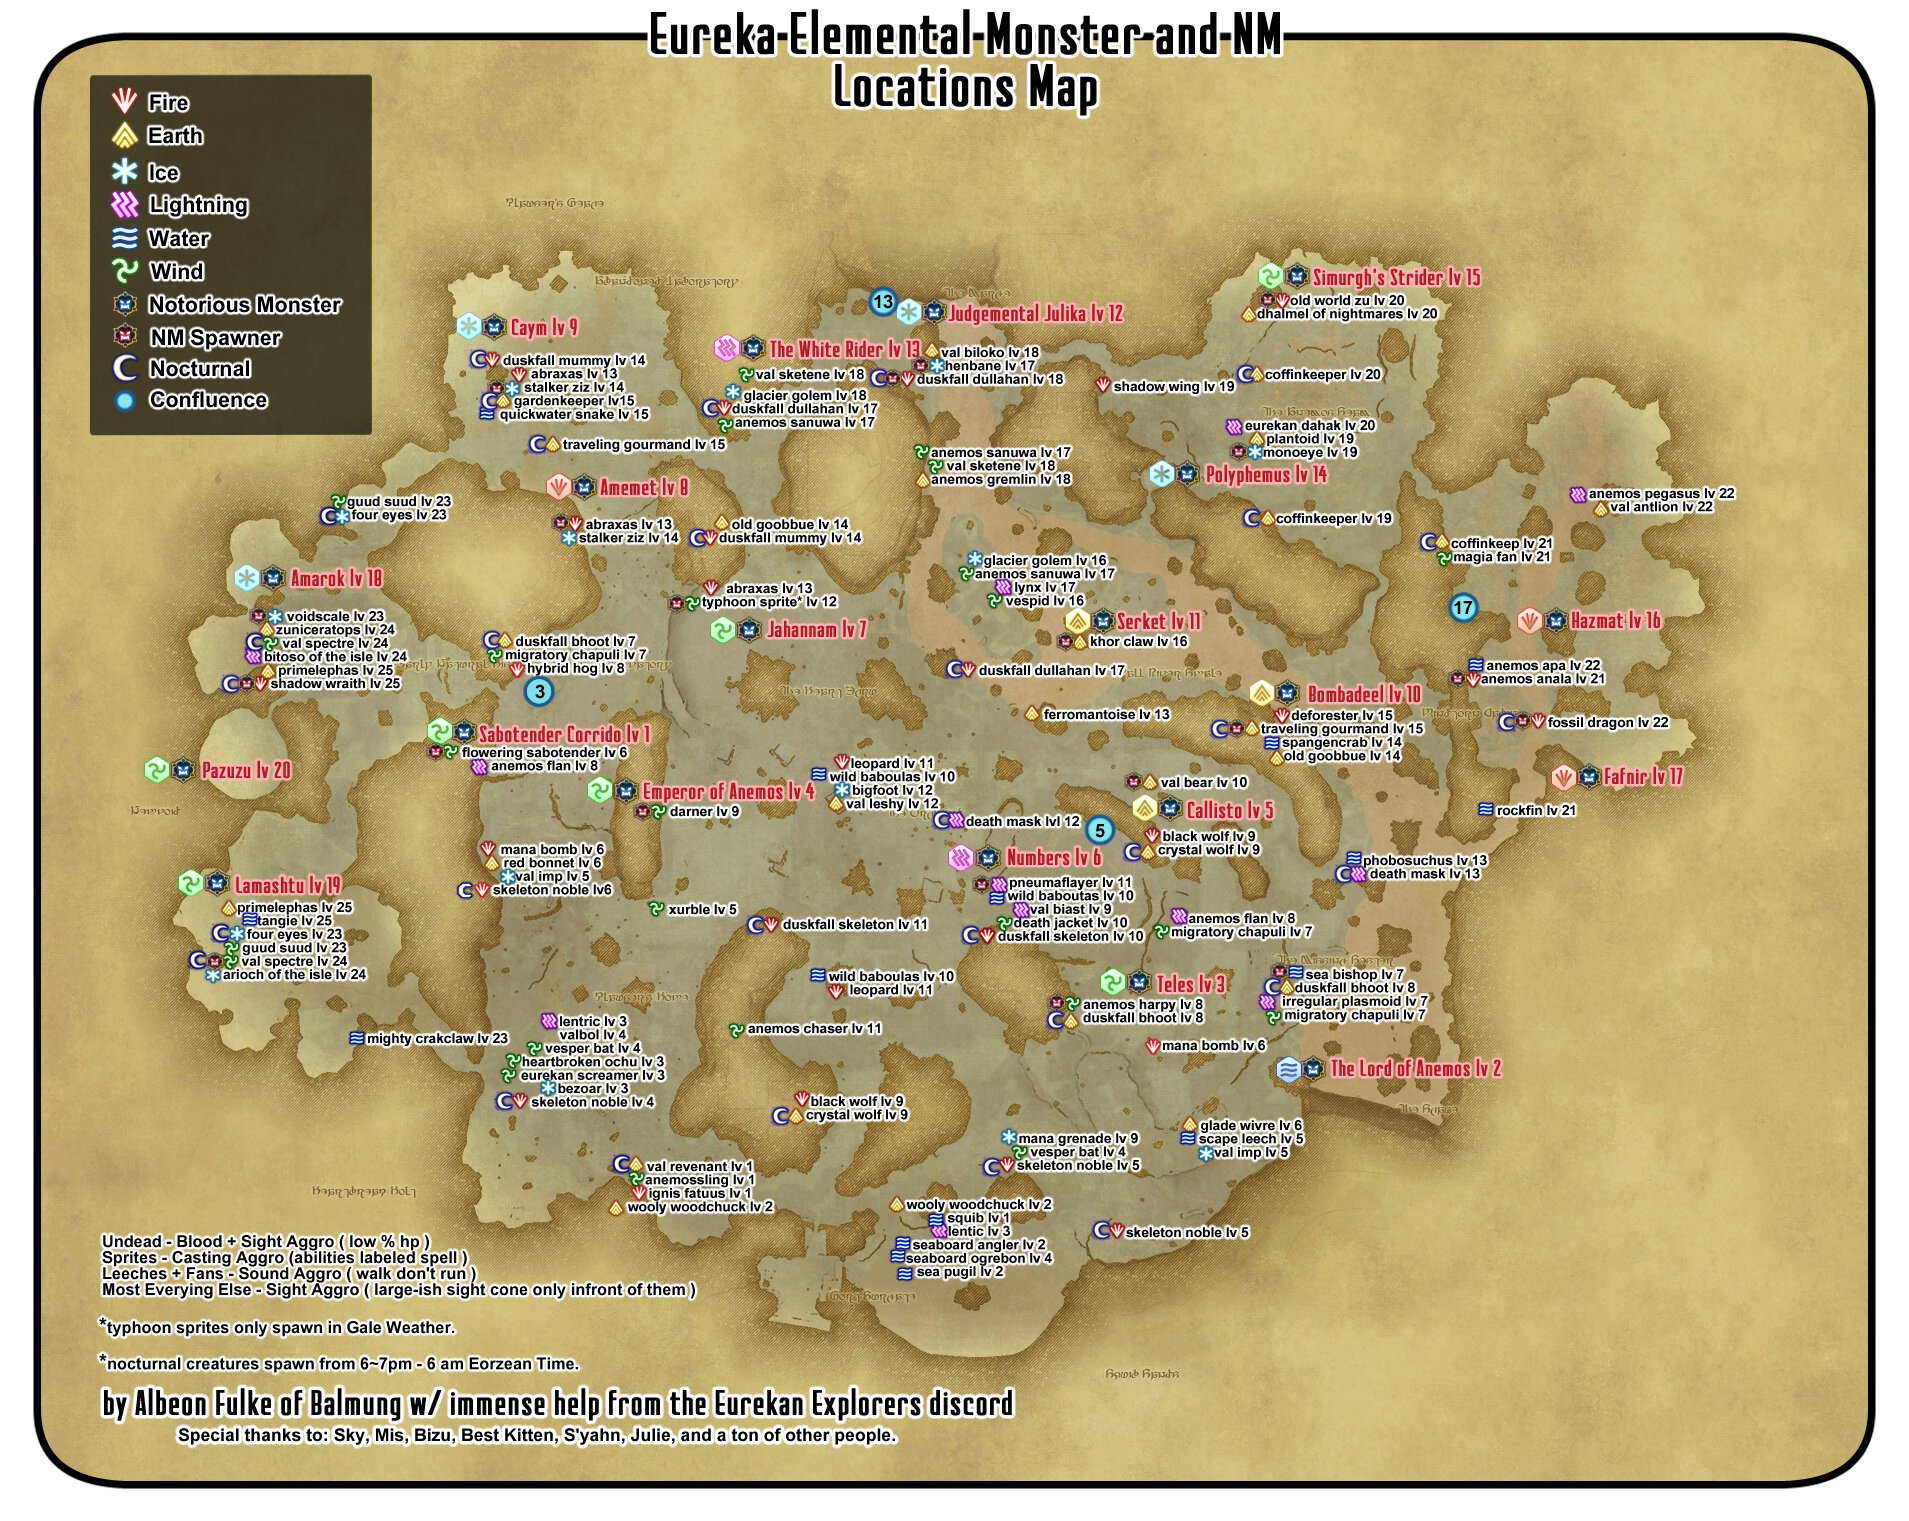
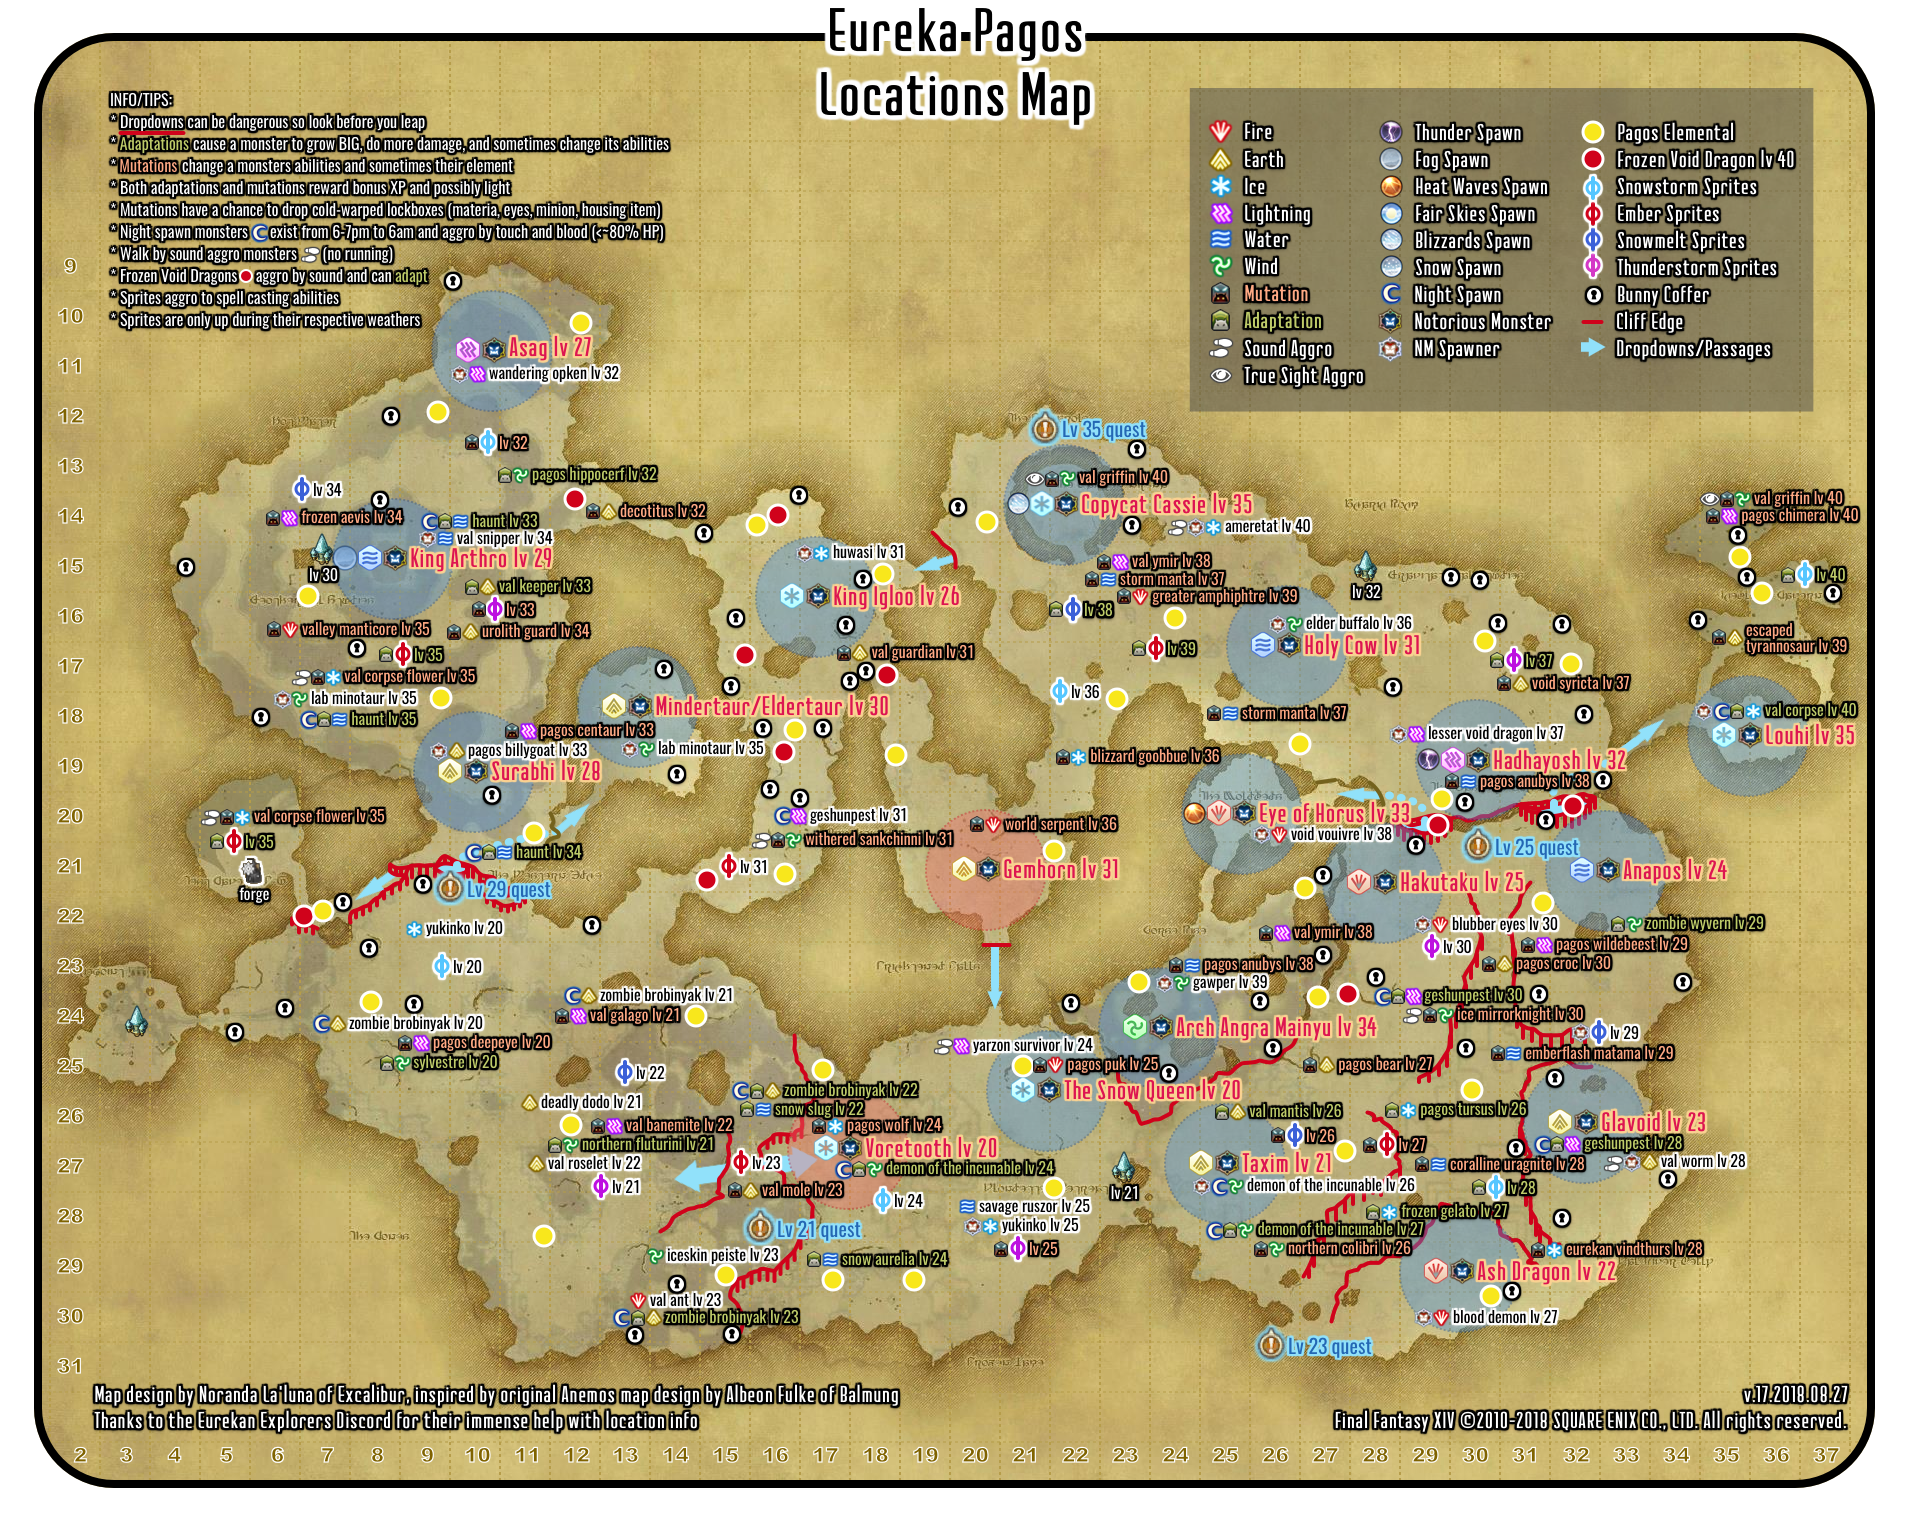
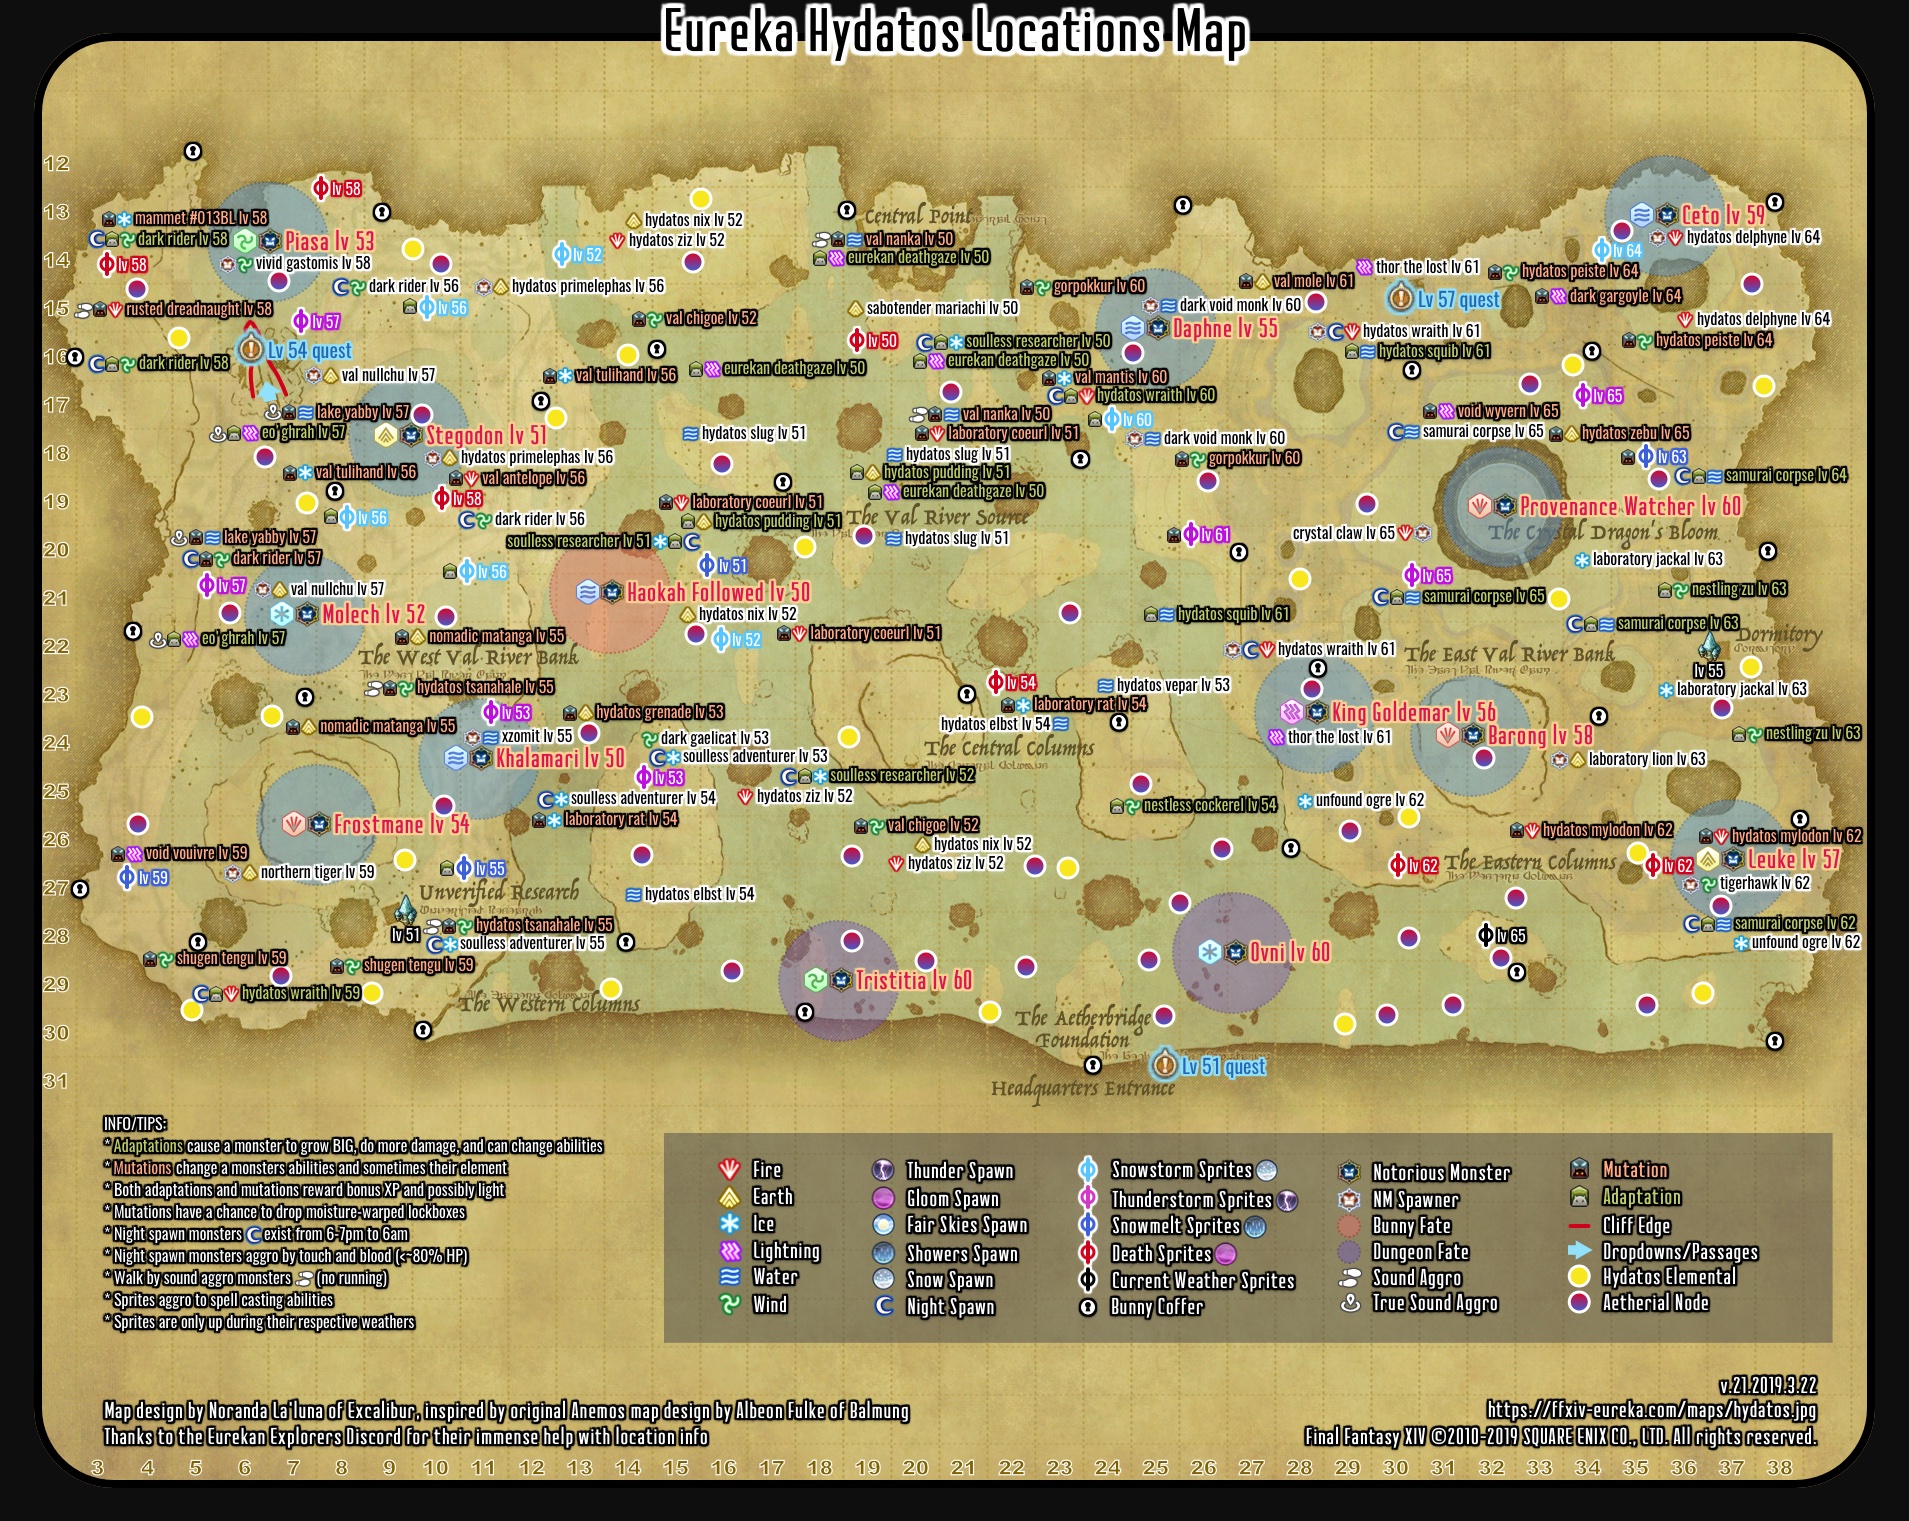
At any time, there are two elementals in any given Eureka zone. If you can find one, stand next to it and it will give you an attack buff and exp buff for the next hour. (It’s also nice to shout out the location so others can come get the buff too.) You can find the possible Eureka elemental spawn locations on the following maps.
Eureka Anemos
Eureka Pagos
Eureka Pyros
Eureka Hydatos
Do every mission from Krile ASAP
Not only do you progress the plot, you get free exp and unlock new features as you progress. Completing all Krile quests inside a Eureka zone unlocks the next Eureka zone.

Do your weekly challenge log
In your challenge log, there are a ton of Eureka-specific missions to do each week. In general, doing them all will grant you two or three levels. All of them are of the “find a specific type of monster and kill it” variety. For efficiency, you should use the following maps to find the type of monster you want to kill with a level two higher than your own. (Do note that elementals spawn only during certain weather and ashkin spawn only at night.)
Eureka Anemos
Eureka Pagos
Eureka Pyros
Eureka Hydatos
Do every “Notorious Monster” Fate you can reach without dying
You’ll notice that Fates will constantly be spawning in Eureka (due to yourself or others killing specific monsters en masse). Even if you’re underleveled, if you can reach the Fate safely, join a party and do the fight. If you’re the correct level or above, you’ll get the items you need to upgrade your weapon as well as a ton of exp. If you’re underleveled, you’ll still get a hefty amount of exp. In general, fates should be how you spend the majority of your time leveling up.
Side Note: You’ll notice that to level up your weapon for the final time in each of the first three Eureka zone, you’ll need rare items. These drop from the highest level Notorious Monster in the zone. However, they can also be purchased from the Expedition Birdwatcher with the same tokens that drop from the normal Notorious Monster battles.

Important Zone Specific Notes
Eureka Anemos:
- Even if you hit the level cap for Anemos (level 20) before you have your weapon fully upgraded, that’s okay. You still get exp and can even level up—you’re just synced down to elemental level 20 as long as you’re in Anemos. (The same basic rule is true for the other Eureka zones as well)
- You don’t need to buy/upgrade the Anemos armor to get the Elemental Armor later on. You only need to upgrade your relic weapon.
Eureka Pagos:
- Your first goal in Pagos is to hit level 25 ASAP and do the main story quests for the area. This will unlock the Kettle. The Kettle fills up a bit for each monster you kill and a fair chunk for each Notorious Monster you slay. It can hold a maximum of 9 Aether Crystals. When it’s full, you take it to The Forge and exchange the content for Frosted Protean Crystals. You will need 31 Frosted Protean Crystals to complete the Pagos version of your weapon so it’s best to start filling up the Kettle as soon as you can.
- You’ll see level 40 dragons sleeping in key chokepoints throughout the map. Walk past them (even while mounted) and they won’t wake up.
- There are two “bunny fates” (where you protect bunny-like creatures from monsters) that spawn almost constantly. Completing these fates starts a treasure hunting mini-game. Unfortunately, the exp they give is pretty terrible so it’s best to ignore and grind exp another way unless you’re actively hunting the items that appear in the chests.
- You don’t need to buy/upgrade the Pagos armor to get the Elemental Armor later on. You only need to upgrade your relic weapon.

Eureka Pyros
- In Pyros, you’ll unlock Logos Actions—special magic spells that give you a significant power boost. As a general rule, elementals, bunny chests, and Notorious Monsters drop the logograms that can be refined to make logos actions. You can also buy logograms from the market board.
- For all the information you could possibly need on Logos Actions and how to make them, hit up the Eureka Tracker.
- You can power level yourself in Pyros thanks to the “Reflect L” lost action. Make a stack or two of these, take off all your equipment (as this strengthens reflect), cast Reflect L, and agro a group of elementals six levels or less above you. Just be sure to recast Reflect L when you have about 2 seconds left on the timer for the last one—or you’ll be spamming general chat for a raise and praying you won’t have to spawn yourself and lose half a level.
- In Pyros, you’ll finally be able to get the Elemental Armor from the Expedition Artisan (15.4-23.9) (though it won’t be dyable or glowy till you upgrade it to +1 in Hydatos) once you have successfully created at least one of 50 different types of Logos Action (there are 56 types in total). The easiest way to do this is to buy the needed logograms from the market board. Due to the rarity of the more expensive of these, it will probably take you around 300k to buy all that you need.
- As before, there are two “bunny fates” that spawn almost constantly. Completing these fates starts a treasure hunting mini-game. Unfortunately, the exp they give is pretty terrible so it’s best to ignore and grind exp another way unless you’re actively hunting the items that appear in the chests.
Eureka Hydatos
- In Hydotos you’ll be able to level up the Elemental Armor pieces you got in Pyros to their “+1” versions simply by collecting enough Hydatos crystals via Notorious Monster encounters and then talking to the Expedition Artisan (x:20.6, y:13.3) in base camp.
- Completing the Krile’s story quest chain unlocks The Baldesion Arsenal, the 56 man raid. This raid has perma-death (with the exception of healer limit break level 3 and the logos actions Sacrifice L and Spirit of the Remembered) and the final boss even has the ability to kick you out of the raid instance. However, complete it and you get an awesome mount as well as a lot of the resources needed to upgrade your Elemental Armor to “+2” and give it an elemental bonus. As the raid is far too complicated to explain here, I suggest watching the following Content Achiever teaching raid from over on the Elemental Data Center. Not only does this show how to get into the raid, it has detailed explanations and callouts so you know what exactly you’re getting into.
- There is only one bunny fate in Hydatos but doing it and finding a silver chest can yield “Aethertight Flasks” that can be exchanged for additional Logos Action slots from the Expedition Alchemist (x:20.9, y:13.4). This can be done a maximum of three times—and you will need these additional slots if you wish to challenge The Baldesion Arsenal.
Other Eureka Resources to Help You Going Forward:
In an effort to keep things as simple as possible and give you a general overview, I have not mentioned a ton of things about the intricacies of how Eureka works and what it has to offer. If you would like to know more about Eureka, I can’t recommend these sites enough.
The Way to Eureka in 5.2 – Similar to this article but more in-depth.
Gamer Escape – A zone-by-zone breakdown of Eureka including all there is to obtain there.
Eureka Tracker – A site that allows you to keep track of Notorious Monster spawn cooldowns and manage your Logos Actions.

In Closing
Eureka is a ton of fun alone or in a group. Hopefully, this guide will be all that’s needed to get you started. Enjoy!


I’m writing this because there is no other efficient and simple guide on the internet other than this. Thank you so much for the hard work on this and all the information that you gave. I’ll use it a lot through my journey in Eureka 🙂